This post may contain affiliate links, meaning at no additional cost to you I may earn a small commission when you click a product or company link. As an Amazon Associate I earn from qualifying purchases.
Once we start talking about creating secure passwords, we need a way to keep track of all those passwords without losing our minds. LastPass is the option I’ve used for several years.
If you don’t have an account yet, go here and either sign for a free enterprise trial (for you entrepreneurs with teams to manage) or click the link in the top corner for a completely free account.
A couple of thoughts as you set up LastPass for the first time:
- Consider using a unique email address that you don’t ever use for anything else. That way a hacker will never think to connect you with that email address or to access LastPass with it.
- Write your password down and keep it in a safe place. You don’t want your LastPass password to be “the last password you ever forget”! So make sure you keep it somewhere safe.
So now what? I got LastPass installed. Now how do I use it?
Table of Contents
1. Turn on two-factor authentication
Two-factor authentication is always a good idea, but especially when you’re talking about an account that’s safeguarding all your passwords.
LastPass offers several two-factor authentication options. To turn them on, you’ll need to view your vault (this is the main page when you log in), go to Account Settings, and click Multifactor Options. Any of the free options will work–these generally require an extra app on your phone. Just click on the pencil icon in the Action column to edit and enable any of these options.
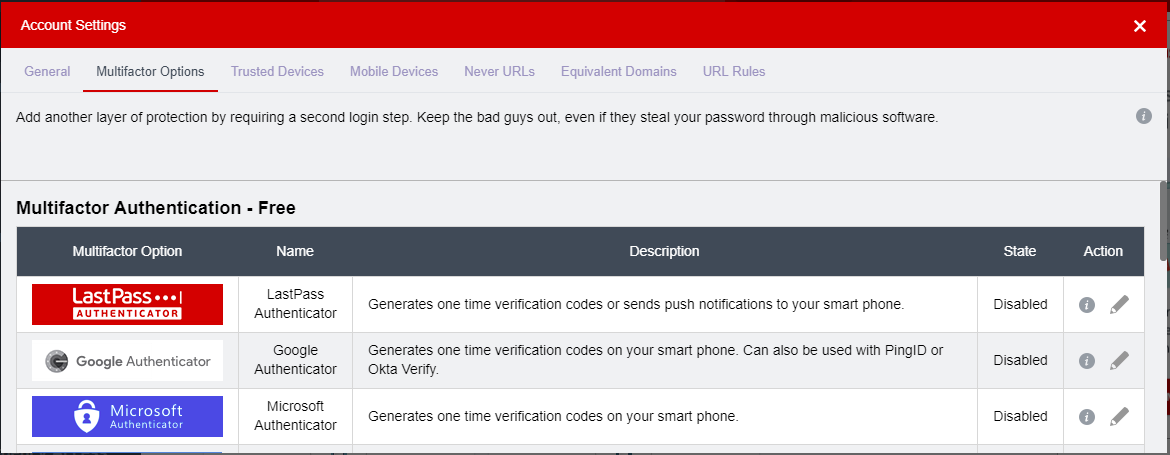
Let’s walk through enabling the Microsoft Authenticator option. If you’d prefer to use a different option, the setup procedure will be similar.
First install the Microsoft Authenticator app from your phone’s app store: Android or iOS.
Then in your LastPass settings, click the pencil to edit the Microsoft Authenticator settings and select “Yes” from the “Enabled” dropdown.
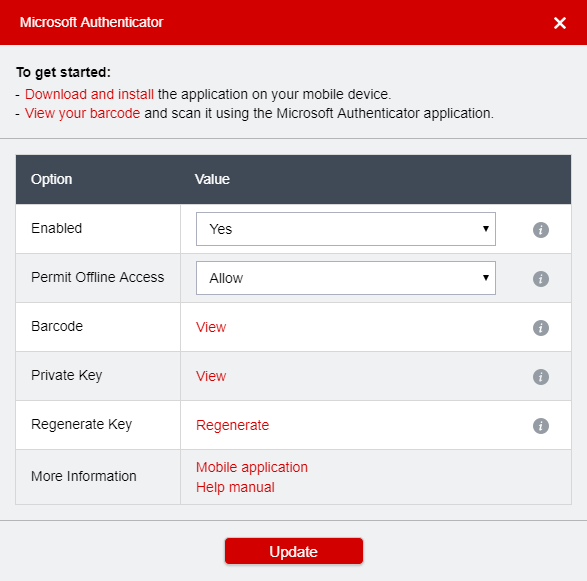
From this same screen click the “View” link next to “Barcode.” You’ll see a QR code.
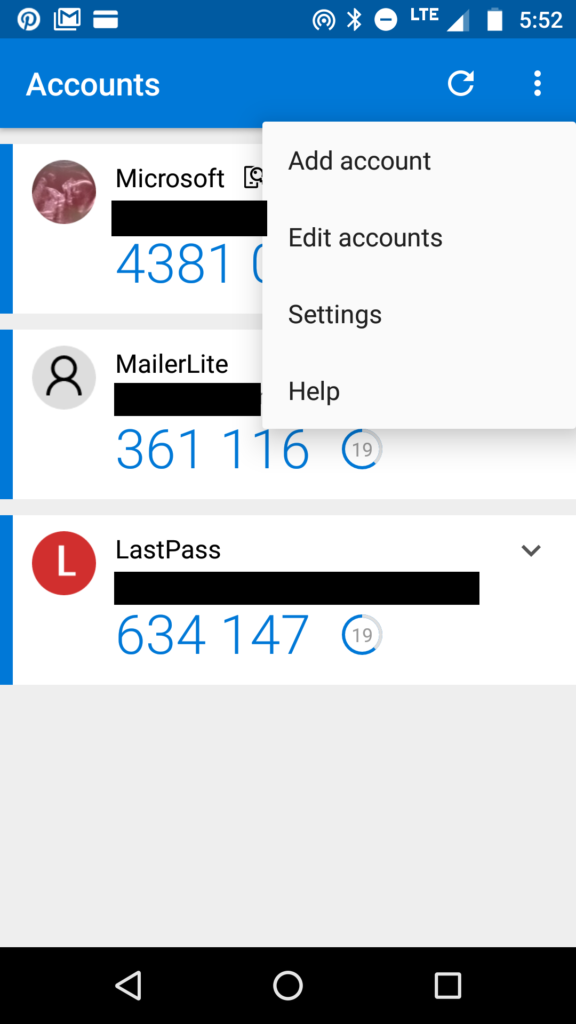
Back on your phone, in the Microsoft Authenticator app you’ll select “Add account” from the menu options and click “Other account.” You’ll now see a scanner that you can use to scan the QR code on your screen. Scan the code.
Back on your computer, click “Update” and enter the current code showing on your Authenticator app. Congratulations! Your LastPass account is now linked to your Microsoft Authenticator account.
Now whenever you log in, you’ll be prompted to enter a code. Just pull up your Authenticator app and type the random Authenticator code into the LastPass prompt.
Just in case your phone is ever lost or damaged (or you just don’t have it with you), you may also want to enable the Grid authentication option. This option will allow you to enter values from a printed grid as your second authentication factor. See the help article for more information on setting up and using Grid.
If you need more security than what you can get with a cellphone, you may prefer one of the paid hardware options–the YubiKey, a fingerprint or smart card scanner, or Sesame. Using these options requires a paid Premium LastPass account but may be worth the added security if you want or need to take more aggressive measures to protect your account.
2. Install apps and plugins
Usually when you sign up for your LastPass account, the browser plugins you need will install automatically. But in case you need to reinstall them, go to the download page to install whatever plugins you need for the web browsers you use.
To use LastPass on your phone, you’ll need to also download the Android or iPhone app. I have used the app on both Android and iPhone, and it’s very easy to use. It integrates fairly seamlessly with your browser and other apps.
3. Add sites to your LastPass vault
Finally! The most important part–how do you actually get LastPass to remember your passwords?
There are a few different options here. If you already have passwords saved in your browser, LastPass will offer to import those passwords when you install LastPass. You can also import passwords from other password managers you may have used in the past.
I think the simplest method is to let LastPass offer to remember your passwords as you browse the web as normal. As long as you are logged into the LastPass plugin on your browser (you’ll see an icon like this ![]() in your browser bar), when you log in to an account that’s not in your vault yet, you’ll see a popup from LastPass asking if you want to add the account to your vault.
in your browser bar), when you log in to an account that’s not in your vault yet, you’ll see a popup from LastPass asking if you want to add the account to your vault.
If for some reason you don’t see the popup when you login (site settings sometimes interfere with LastPass’s password detection), you can always click the icon in your browser’s toolbar and click “Sites,” then “Add Site.”
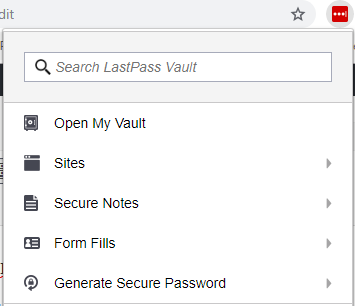
Fill in your username and password to have LastPass remember the site’s login info. Then, when you come back to the site in the future, LastPass will either automatically fill in the details for you, or you can click the LastPass icon to fill it in from matching sites.
Sometimes in the past I’ve had issues with LastPass not wanting to fill in my login details. When that happens, you can either click on Matching Sites or search your vault for the correct site. From there you can copy the username and/or password and manually paste them in place.
4. Creating new accounts with LastPass
This is one of the coolest features LastPass offers. No more struggling to create a secure password with all the length and character requirements (ugh)!
When you create a new account, you’ll now see a lock icon in the password field. Click that icon and then the “Generate and fill” button.

To change password options such as length and required characters, click “More options” first and then click “Fill.”
5. Run the LastPass security challenge
OK, so you’ve got your accounts into LastPass, but you know that your passwords aren’t as secure as they should be. Want to quickly and easily get your existing accounts up to date with secure passwords?
Go to your LastPass vault and click “Security Challenge.” Click “Show My Score,” and LastPass will get to work analyzing your existing sites.
When you get your results, LastPass will give you a list of quick and easy ways to upgrade your password security. They’ll even automatically change some of your passwords for you. When you’re a mom working with limited time, anything that makes things easier for you is a definite win!
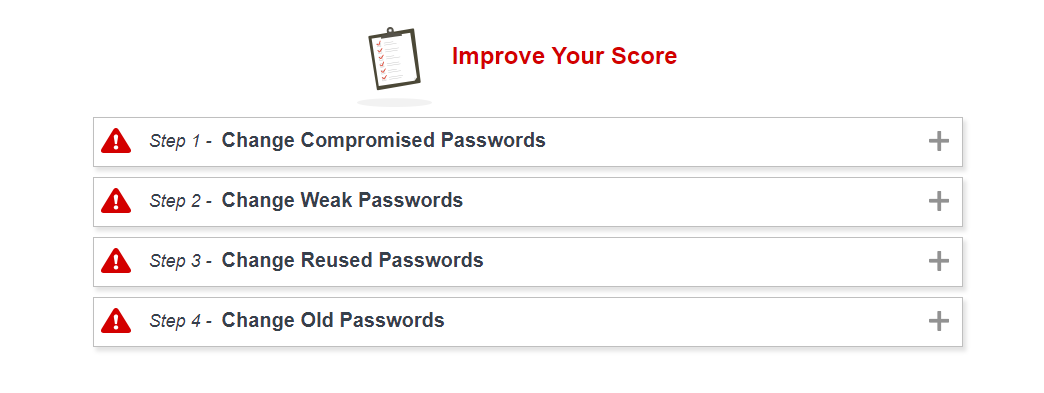
For sites that LastPass can’t automatically change, you’ll need to click over to the site, login, and find the password change option in your account settings. That’s a little more work, BUT remember that LastPass can generate the new, secure password for you! Just click the icon in the password field, generate, and fill.
6. Securely share passwords
A handy feature that my husband and I have used on occasion is to share passwords with each other for sites we both need to access. I like that you have a couple options here. You can either share the login info with details visible–so the other person can see the password–or you can share it with no details attached, so the other person can log in but doesn’t know what the password is.
To share a site, just search for the site you want to share, hover over the site card in your LastPass vault, and click on the “Share” icon. Enter the LastPass email address of the person you want to share it with.

If you want them to be able to see the password, select “Allow Recipient to View Password.” Click “Share.” The person you want to share with will just have to accept the share request to add the login info to their own LastPass vault.
7. Other features
Want to save time filling in forms with info like your name, email address, mailing address, and credit card info? LastPass can save that for you too and make your digital life so much easier. (Careful, though–you might not want to make it TOO easy to splurge on a set of new books for your library… Ummm, right? Can we say “LastPass made me do it”?)
For more on auto-filling forms, check out official LastPass article here.
You can also save secure notes with LastPass if you have other important things to remember, like your kids’ social security numbers or insurance information.
Another interesting feature that I have not personally used but that I plan to set up is the ability to grant emergency access to your account. If something were to happen to you, having granted emergency access to a trusted loved one would allow necessary access to your account. With so much of our lives online, this seems like a necessary feature. Read more here.
Ready to explore a more balanced digital world?
I invite you to join my Facebook group, where we are “Discovering Digital Intentionalism.” Join us to become part of a growing movement of individuals seeking to declutter, organize, and optimize our digital lives.


