This post may contain affiliate links, meaning at no additional cost to you I may earn a small commission when you click a product or company link. As an Amazon Associate I earn from qualifying purchases.
When I told my husband I was going to write a post about Google Chrome privacy settings, his response was, “Step One. Install Firefox.”
Yes, I could tell you that the best way to make Chrome private is not to use it. After all, Google’s product is you. (For more on just how much Google knows about you, check out this eye-opening MakeUseOf article.)
But I also understand that Chrome has over 60% of web browser market share. And I believe in not just having alternatives but also making the things we already use just a little bit better. It’s about balance.
The following Chrome privacy settings are easy to adjust. Just a couple minutes of your time can help you create a more private browsing environment.
Before you change any Chrome privacy settings, you’ll need to enter the settings menu. Click the ⋮ icon at the top right corner of the browser and click “Settings.”
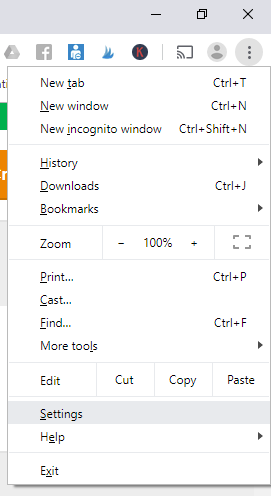
You can also type chrome://settings/ in your address bar.
Table of Contents
1. Sign out of Google Chrome…
Changing Chrome privacy settings is all about trade-offs. While signing in to Chrome has its benefits–you can sync your settings, history, and bookmarks across all the devices you use Chrome on–it also helps Google create a much more complete profile of you.
What you do on your phone is probably different from what you do on your laptop, for example. All those YouTube videos? Those are part of Google’s picture of you too.
Related: Is YouTube Safe for Kids?
Maybe you like Google to have a more complete picture of you. That completeness makes their advertising more relevant, and maybe you like relevant advertising.
But if you’re reading this article, I’m going to guess you care enough about privacy to be just a little bit uncomfortable with Google knowing you that well.
If you’ve signed in to Google Chrome, it’s easy to sign out again. From the settings menu, the first thing you’ll see is your email address if you’re signed in. (Otherwise you’ll see a button that says “Sign in to Chrome.”) To the right of your email address you’ll see “Sign out.”
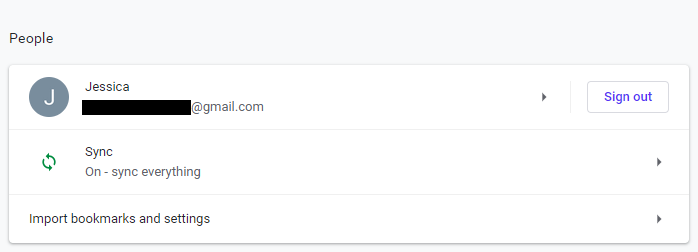
Click “Sign out” and then click “Sign out” again on the confirmation popup.
While you’re at it, you’ll probably want to click “Advanced” at the bottom of the settings page and turn off “Allow Chrome sign-in.” Otherwise, signing in to a site like Gmail can automatically sign you in to Chrome.
Related: Do You Need to Encrypt Your Emails?
…Or fine-tune your syncing
If you decide you like syncing and choose to stay signed in, you can choose which data gets synced across your signed-in devices. Just be aware: I don’t believe that changing those settings affects the picture that Google is building of you as a user. It simply changes what data you can access between devices.
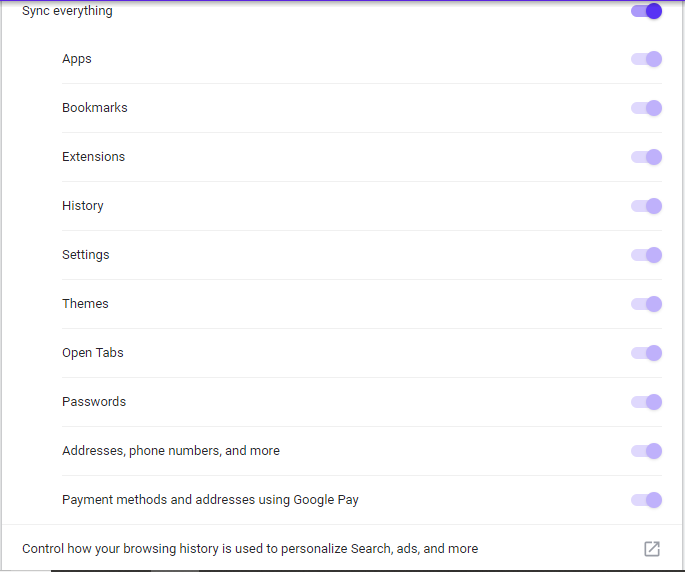
Turn off anything you don’t want to sync between devices.
From this same screen, if you click “Control how your browsing history is used to personalize Search, ads, and more,” you’ll be taken to the Activity controls setting. Turn off “Web & App Activity” to stop Google from using your data to tailor your ads and search results.
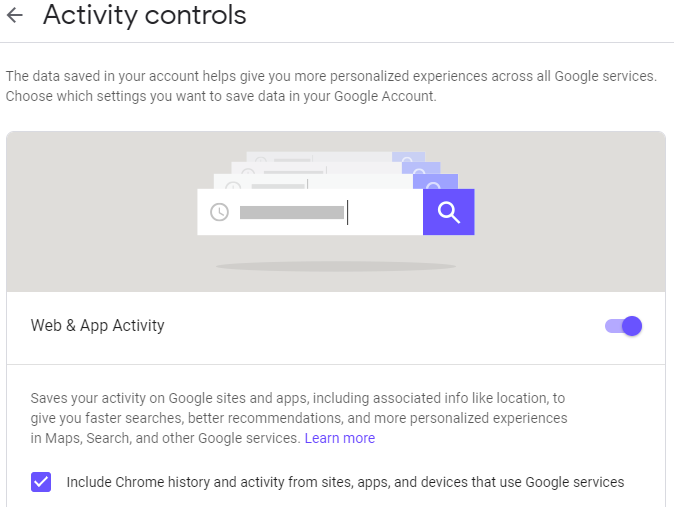
It won’t mean Google stops collecting that data (otherwise, how would they keep your data synced?), but it should affect how they use the data. So that’s an option if you absolutely must sync your account across devices.
If you’re going to sync data, it’s also a good idea to turn on the option to encrypt your synced data with a passphrase. That way if you ever accidentally sign into Chrome on a shared computer, no one will be able to access your synced data without your passphrase.
For most of the rest of the settings, you’ll need to scroll down to the bottom of the settings screen and click “Advanced.”
2. Make your address bar more private
By default, everything you type in your Chrome address bar–from your web searches to the websites you visit to the things you start to type and then change your mind about–gets sent back to Google.
Again, it’s about trade-offs. Google uses that data to give you a better user experience and make the internet a safer place. Chrome can offer you suggestions and make your pages load faster.
It can also fix your spelling errors, improve Google’s Safe Browsing technology, and make their products more user friendly as they learn how people are using their software.
So it’s a question of how comfortable you are with Google knowing every single thing you ever type in your address bar or every site you visit. If you’d prefer a more private approach, these are the settings you may want to turn off in the Advanced settings list:
- Use a web service to help resolve navigation errors
- Use a prediction service to help complete searches and URLs typed in the address bar
- Help improve Safe Browsing
- Use a prediction service to load pages more quickly
- Automatically send usage statistics and crash reports to Google
- Use a web service to help resolve spelling errors
For more on what each of these settings does, see the Chrome support document here.
3. Turn off browser tracking
It’s kind of a toss up whether you need this option or not. Most websites do some sort of tracking when you visit–analytics on the kinds of people who visit a website and the site content that they like to read is very useful for website owners in creating content that you want to read.
But if you’re not comfortable with this kind of tracking, you can turn on the “Do Not Track” option. However, this option is merely a suggestion (and not actually required) for website owners. So you can ask not to be tracked, but it might not actually happen.
4. Keep your location private
Does Google really need to know where you live? Well, maybe. It sure makes using Google Maps easier. But if you’d rather keep your location to yourself, I suggest making two changes.
First, turn off location tracking. Yes, sites you visit (and Google when you use Chrome) can get a general idea of your location from your IP address, but you can prevent them from pinpointing your precise location under Privacy and security > Content settings > Location.
The default setting is for Chrome to ask first when a site wants to access your location. But you can turn the setting off completely. Most of the time you can enter an address manually instead of having it detected automatically.
Of course, entering your address manually probably gives some information away too… But we have to draw the line between privacy and practicality somewhere.
Second, ask Chrome not to remember your addresses or payment information. Go to Autofill > Addresses and more and turn off Save and fill addresses.

5. Don’t eat too many cookies
Browser cookies can be useful. They keep you logged in to sites and let you use the online shopping carts at your favorite stores.
But they can also be used to follow you around on the internet and track your behavior. Things like advertising networks use cookies–and that’s why you’ll often see the same ads pop up over and over and over again (ad nauseum–pun not intended) in the ads you see around the web.
To limit the cookies websites leave on your computer, go to Privacy and security > Content settings > Cookies and turn on Block third-party cookies.
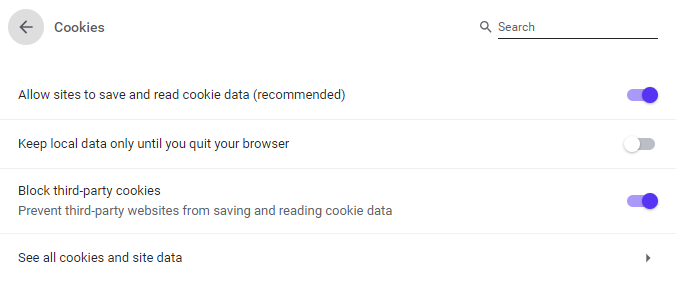
To delete the cookies already stored on your computer, go to See all cookies and site data and click the Remove All button. After removing cookies, you may find you’ll have to re-enter some information or log in again to the sites you were logged into.
6. Change your default search engine
All right, I’ll admit–even on Firefox I still use Google’s search engine. It’s convenient, and Google has put so much time and research into having a highly effective search engine.
But there is evidence that Google changes your results based on what it thinks you want to see… Or, if you think they’re being more nefarious, based on what Google wants you to see.
And there are more privacy-minded options. My husband uses DuckDuckGo, for example.
To change your default search engine, go to Search engine > Manage search engines. From there you can choose from a variety of search engines. Simply click the ⋮ next to the engine you want and click Make default.
A note about Chrome’s incognito mode (in-private browsing): is it a privacy setting?
You may think that the best way to browse privately is to use Chrome’s incognito mode. But that’s not exactly correct.
Browsing in incognito mode keeps your activity out of your browser’s history, but you don’t become anonymous. Sites still receive your IP address. Your internet service provider still sees the sites you visit. Google still knows what you’re doing.
And anything you download stays on your computer (even though it stays out of the browser’s download menu). So don’t depend on incognito if you really want to be incognito.
Chrome privacy settings require trade-offs between privacy and convenience
How concerned are you about privacy? I personally tend to lean more toward the convenience side than the privacy side, but my husband is definitely much more privacy minded.
Thanks to his influence I’ve started primarily using Firefox and script blockers. An added side benefit is that my computer’s processor isn’t working quite so hard now to keep up with all those scripts and tracking.
But if you’re super attached to Chrome, these settings can help you browse a little more privately. Or at least help you pick and choose what’s most important to you.
Found this post helpful? Please consider pinning to Pinterest!
